How to Buy Dogecoin on Gate.io
Dogecoin, or DOGE, is a famous meme coin. Championed by Elon Mush and the DOGE community, the coin became world famous, despite having little value or worth. Several years later, it remains one of the most popular cryptocurrencies in the world.
If you want to buy Dogecoin on Gate.io but don’t know how we’ve got you covered. Here is a step-by-step breakdown of how to buy Dogecoin on Gate.io.
A Step-By-Step Guide on How to Buy Dogecoin on Gate.io
1. Register an Account on Gate.io
If you don’t already have a Gate.io account, visit the official Gate.io website and sign up for an account. You’ll be directed to the sign-up page if you follow our link.
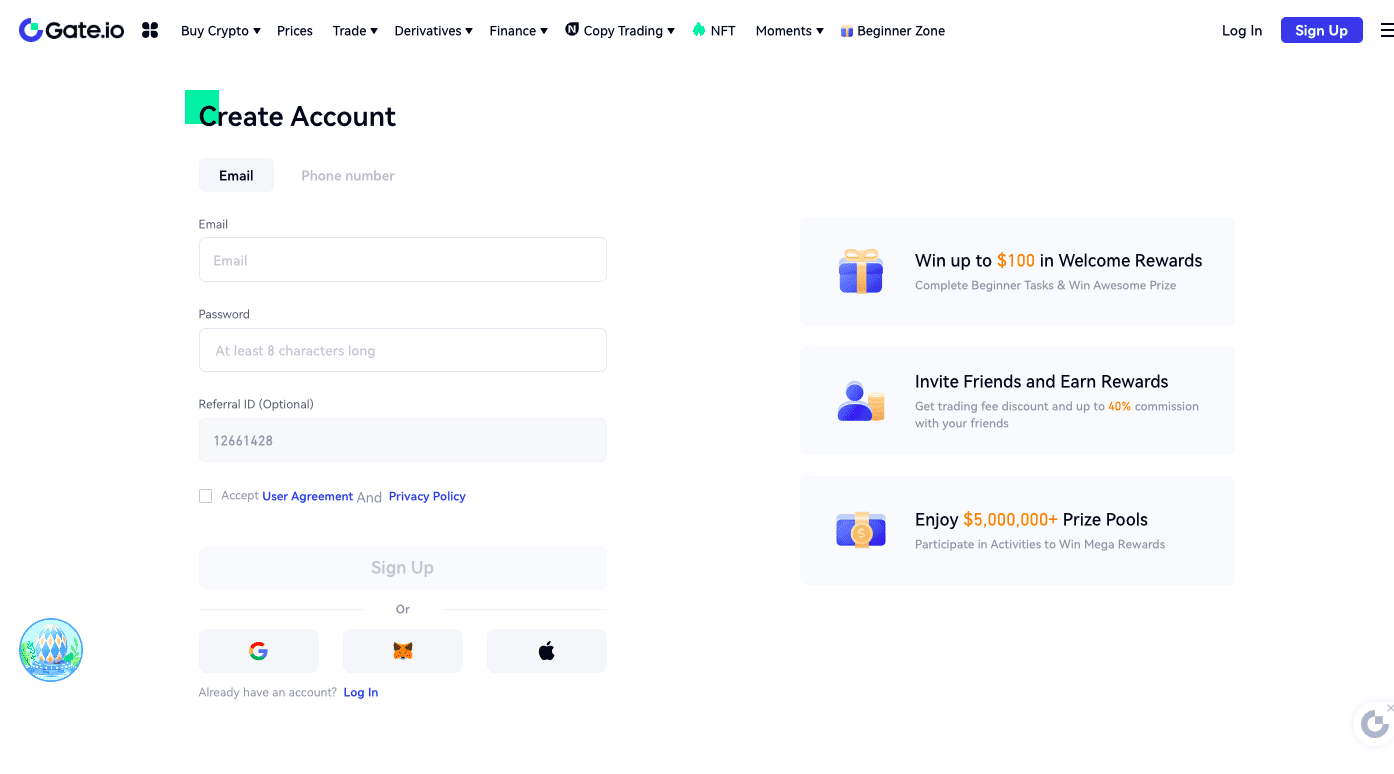
You can create an account with your phone number and email address or sign up via your Google or Apple ID. Enter the relevant information on the sign-up page and click “Sign up.”
You’ll receive a confirmation e-mail or code, depending on how you signed up. Use the confirmation message to sign in to your account.
2. Verify Your Account
Once you sign in, click the profile icon on the top right tab. Select “KYC (Identification)” from the dropdown menu.
You can set up an account for individual or business purposes. If you’re buying DOGE on your own behalf, click “Verify Now” on the box labeled “Individual.”
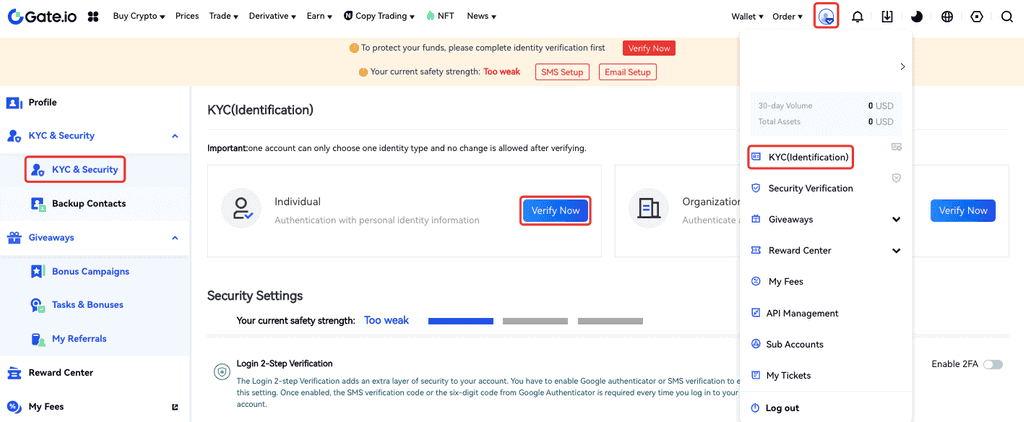
Once you click “Verify Now,” you will see the information form you should fill out. Fill in all the required information, including your full name, date of birth, country of residence, and the type of ID you’ll use to verify your identity. Click “Confirm and Submit.”
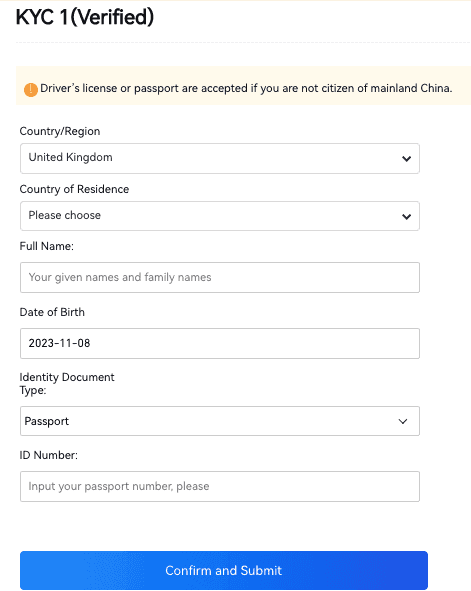
This completes the initial verification step, but you must continue to KYC2 verification to be able to take full advantage of the platform.

Select the “KYC2 Verification Plus” tab. Enter your full address on the information form, and upload a photo ID (a passport, a driver’s license, or a state-issued ID).
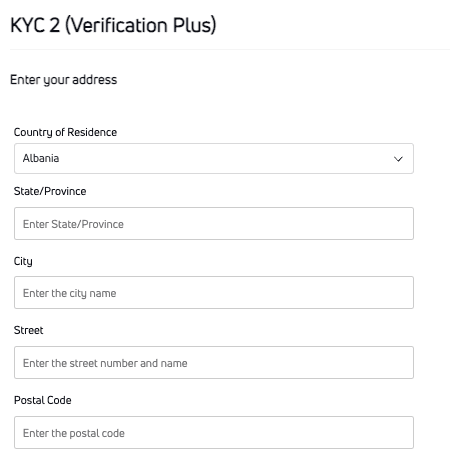
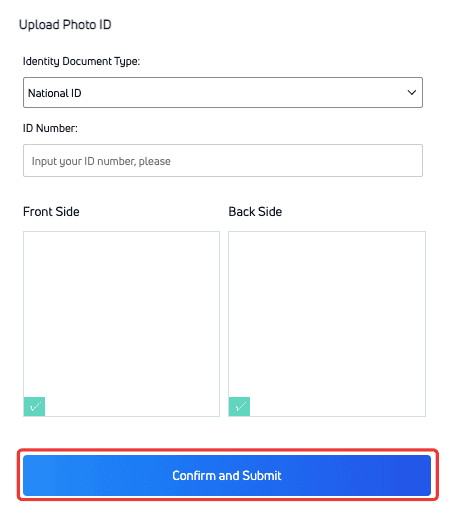
Once you fill out the form, click “confirm and submit.” The next step is facial ID verification. Click on “Go to Facial Recognition,” and you’ll be redirected to the face recognition step.
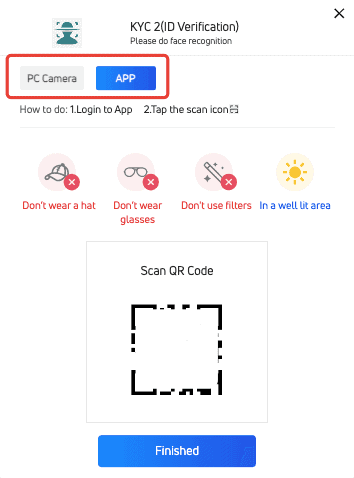
If you have a working laptop camera, you can complete this step on your browser. The supported browsers are Brave, Chrome, Opera, and Firefox.
You can also use the Gate.io app on your phone if you don’t have a laptop camera.

Read the instruction carefully to ensure your visuals aren’t rejected by the program. If the page doesn’t respond once you enable facial recognition, you may have to switch to a different browser.
If the facial recognition program doesn’t recognize your face, you can get around the issue by uploading gesture photos.
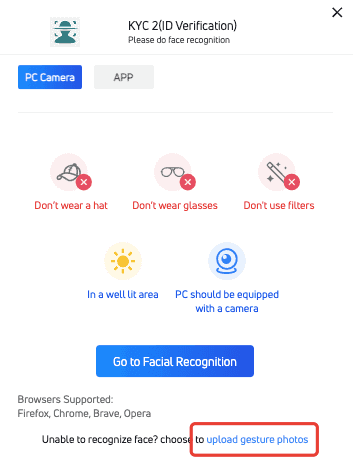
Click on “Upload Gesture Photos.”
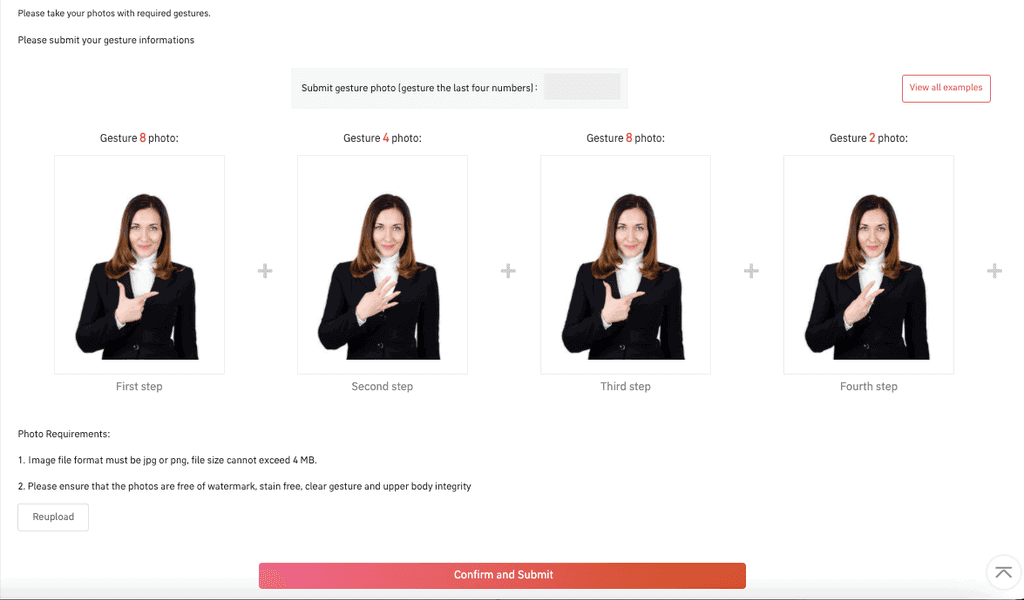
Take four selfies of yourself. You must gesture the last four digits of your UID on the photos. In the selfies, ensure your entire upper body is visible and the pictures are clear without smudges or watermarks. The photos should be in JPG on PNG format and 4MB at most.
If you click “View All Examples” on the top right, you can see several examples that clarify how this step should be completed. Once you upload the photos, click “Confirm and Submit.”
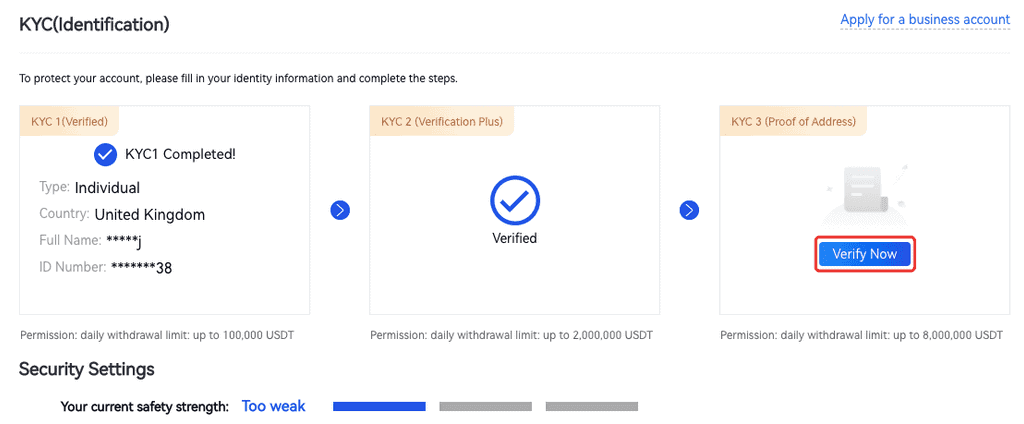
Once you complete this step, you must move on to the KYC3 verification process by clicking “Verify Now.” At this step, you must provide proof of address by entering one of the requested documents, such as a bill or lease agreement photo.
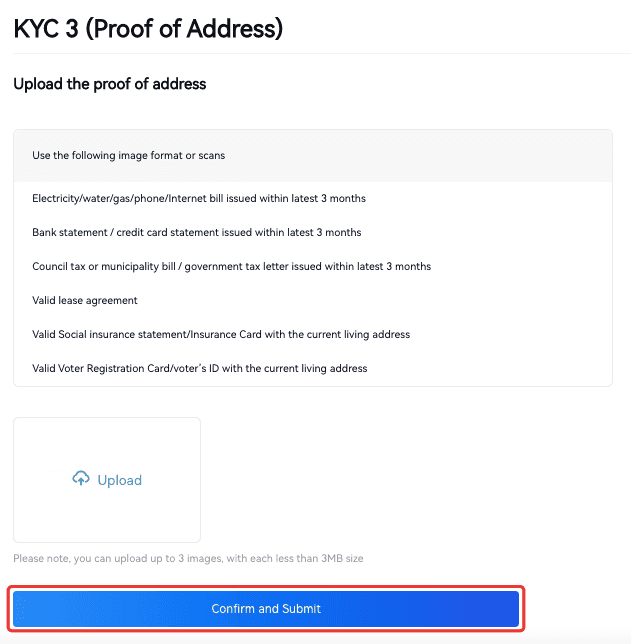
Once you upload the documents, click “Confirm and Submit” to conclude the verification process.
3. Enable 2FA
Depositing to Gate.io is pretty simple, but before you start, we strongly suggest you enable two-factor authentication on your account to ensure your funds are kept safe.
To enable 2FA, click on the “Settings” tab on top of your dashboard. On the dropdown menu, select “Security Settings” and “Two-Factor Authentication.”
Next, go to “Security Settings” and click “Two-Factor Authentication.”
Gate.io uses the Google Authentication app to secure your account. Once you set it up, the app will provide a new one-time password each time you log in to your account.
Download the Google Authentication app on your mobile device and set it up. Then, scan the QR code on the Gate.io website with the app. The app will generate a code you must enter in the “TOTP box” along with your fund password.
Once you are done, click “Enable Two-factor Authentication.”
4. Deposit Funds/Crypto
If you already own cryptocurrency, you can deposit it to your gate.io wallet and trade it for Dogecoin.
You can skip this step if you don’t own any crypto assets and want to buy DOGE with cash.

To transfer your crypto assets to Gate.io, click on the “Wallets” tab on top of your dashboard. You can see a list of all supported assets on the page. Type the name of the asset you want to deposit in the search bar.
For example, let’s say you want to deposit Bitcoin into your account. Type BTC and click on “Deposit.”
When you click “Deposit,” Gate.io generates a unique deposit wallet address for your use. You can use the address to send yourself BTC.
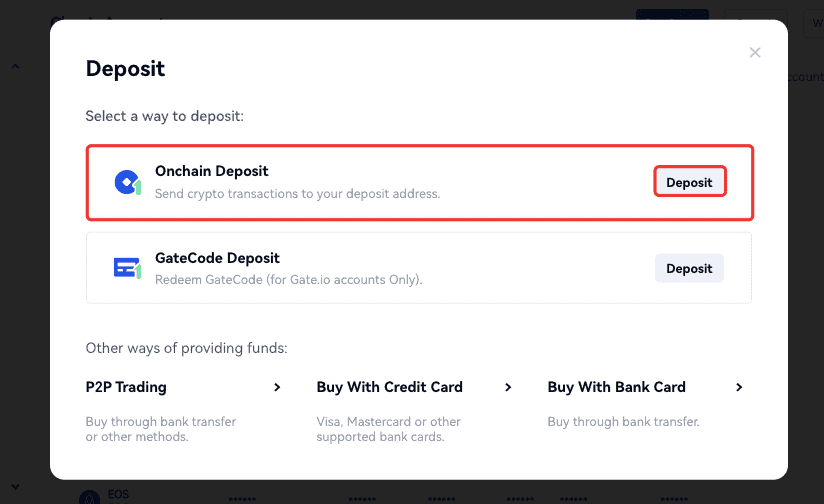
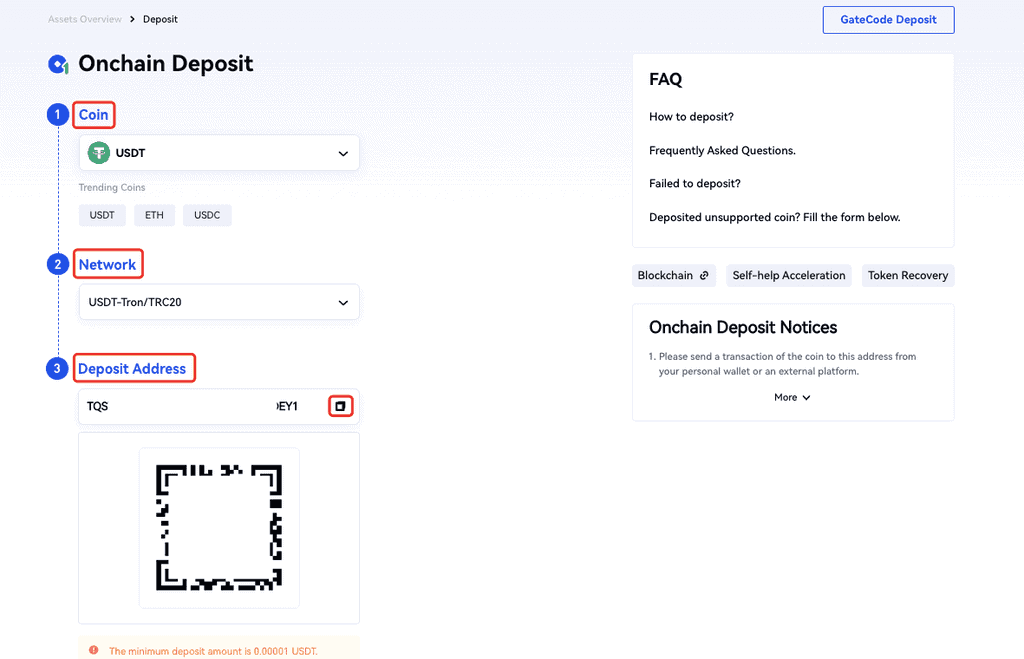
Navigate to your sending wallet and enter your Gate.io address. You can also use the QR code if your exchange or wallet supports QR codes.
After a few blockchain confirmations, you will receive the assets in your gate.io wallet. You can check Recent Deposit Records to see if your assets have been transferred.
3. Navigate to Buy Screen
There are two ways you can buy DOGE on Gate.io. If you transfer your crypto assets from another wallet, you can trade them for DOGE in the Spot market. If that’s what you want to do, follow the instructions under “Buy Doge on the Spot Market.”
If you don’t have digital assets on the platform, or you want to buy DOGE with fiat money, follow the instructions under the “Buy with Fiat Money” option.
Buy Doge on the Spot Market
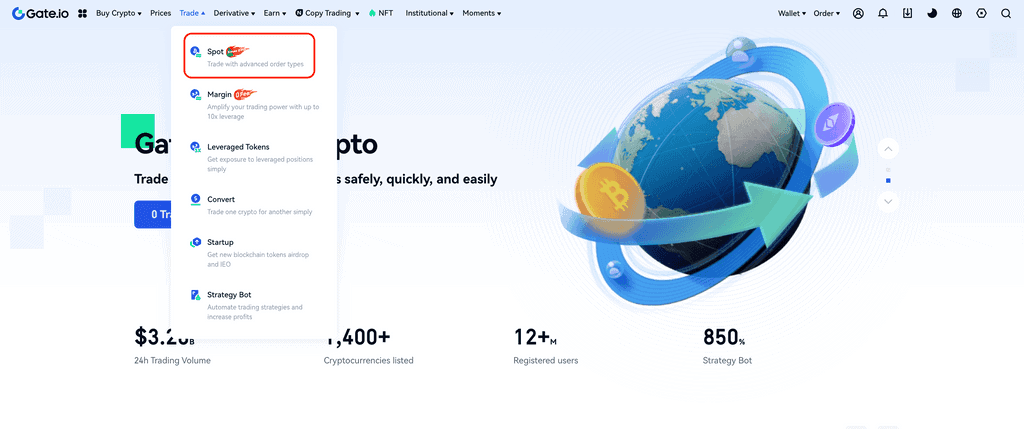
On the dashboard, click on “Trade” and choose “Spot” from the dropdown menu.
Type the pair you want to trade (for example, BTC/DOGE) in the search column on the left.
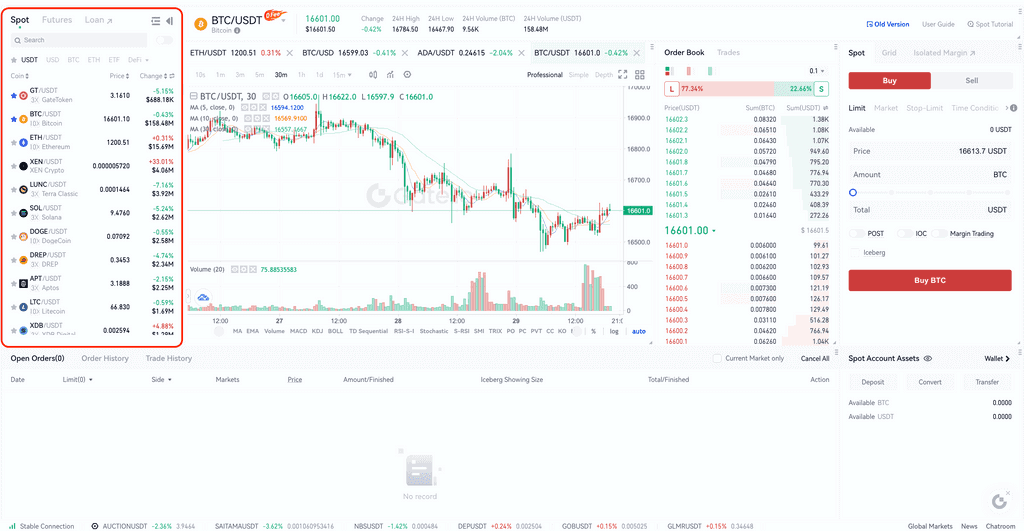
On the right box, you can set how much DOGE you want and set buy and sell prices for DOGE and BTC. Once you enter all the relevant info, click “Buy DOGE.”
Review your order on the next page, and click “confirm.” That’s it!
Buy with Fiat Money
Gate.io supports several third-party payment apps like Moonpay and Banxa to buy crypto with fiat money. These apps support over 80 fiat currencies, including USD, GBP, and EUR.
To get started, navigate to your homepage, select “Buy Crypto” on the dashboard, and click on “Credit Card.”
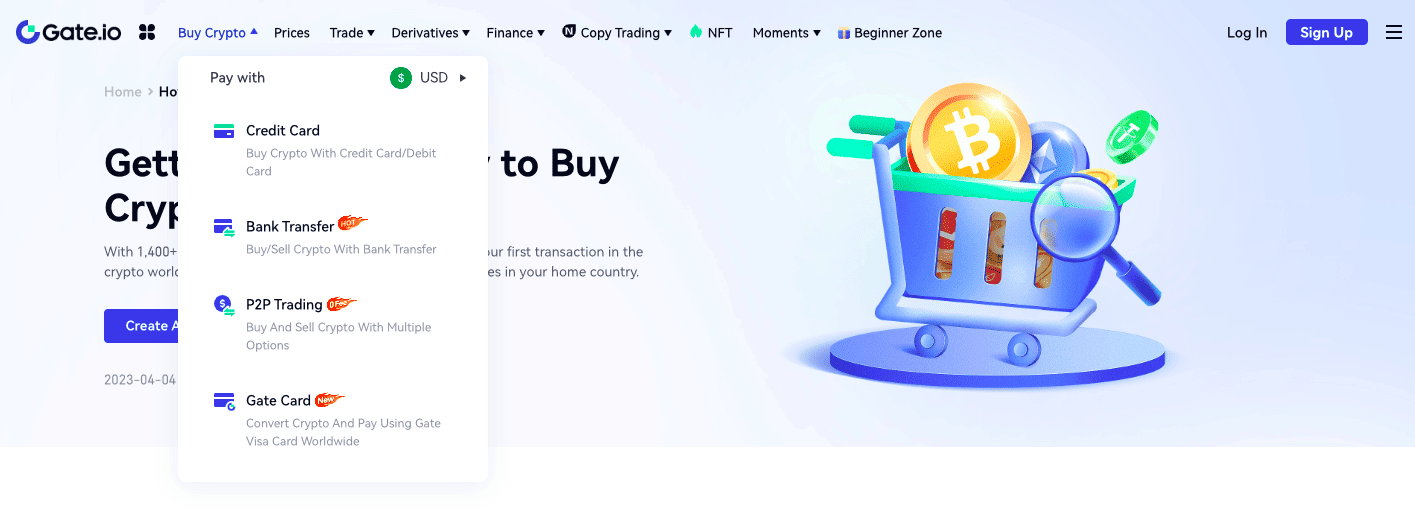
On the “Buy” form, select the fiat currency you want to spend and the cryptocurrency you want to purchase (DOGE).
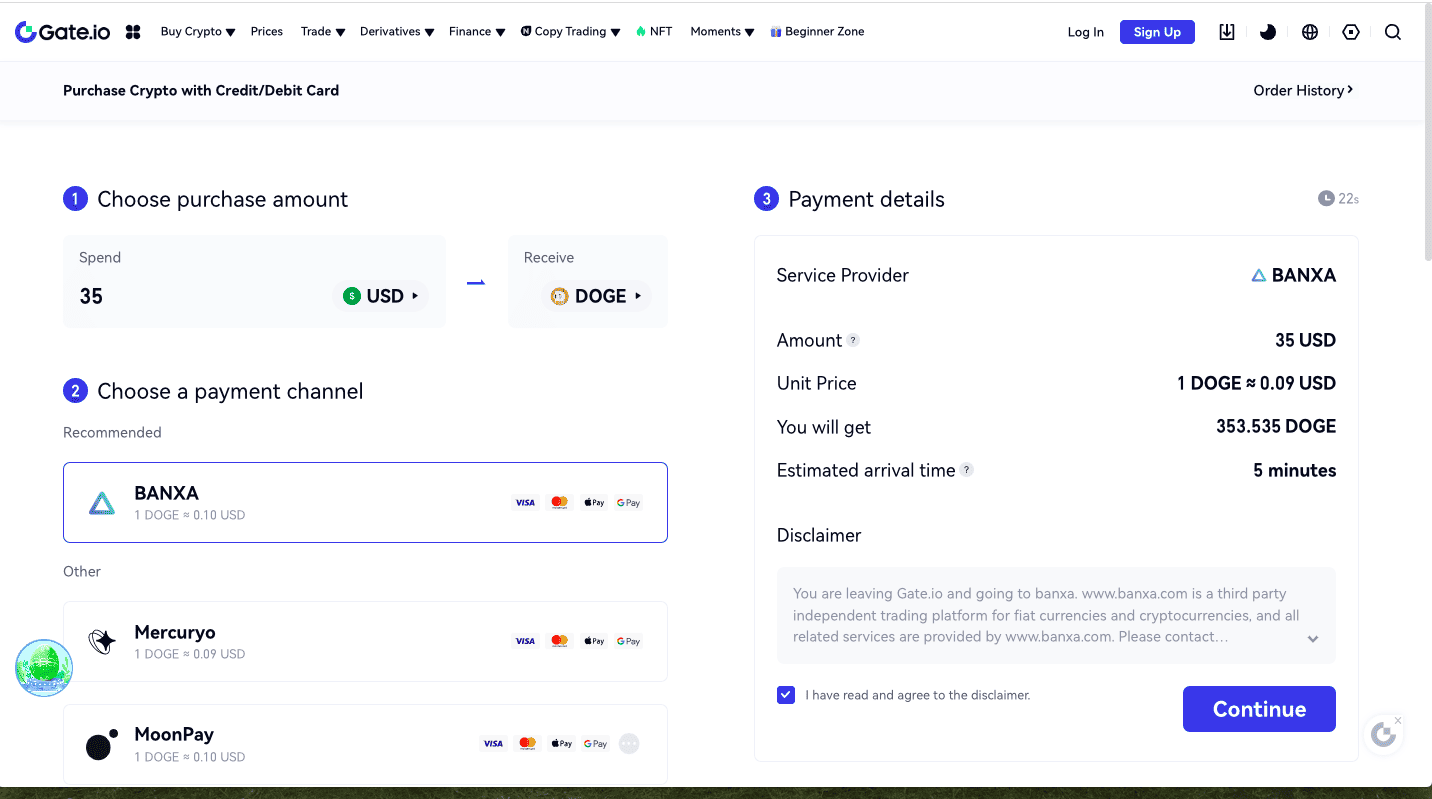
Enter how much fiat currency you want to spend (there is usually a 35 USD minimum limit). Select the payment channel you want to use. Different payment channels offer different fees and minimum buy limits.
For example, we chose Banxa, which has a 35 USD minimum buy limit.
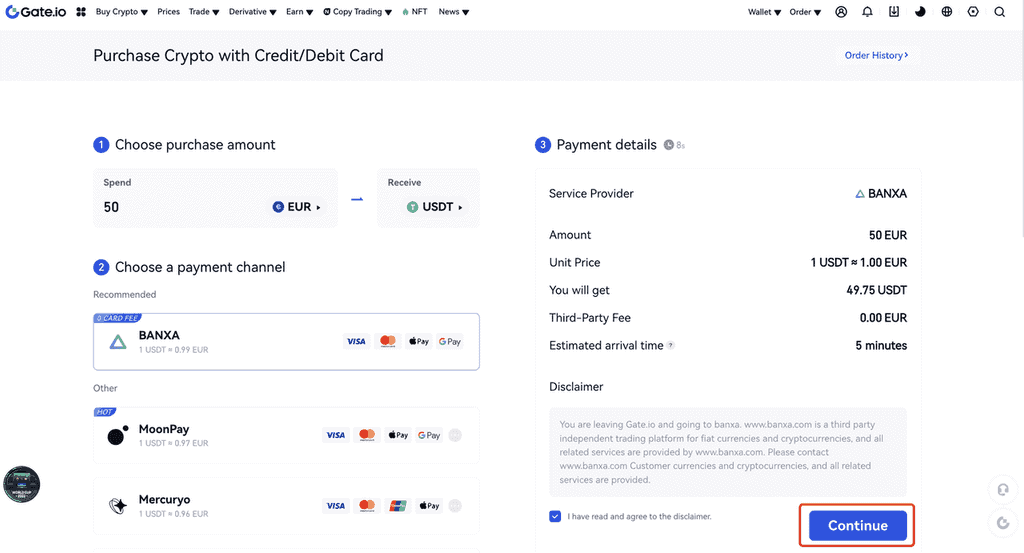
Review your order and click “Continue.” Once you click continue, you’ll be redirected to the third-party payment channel’s page.
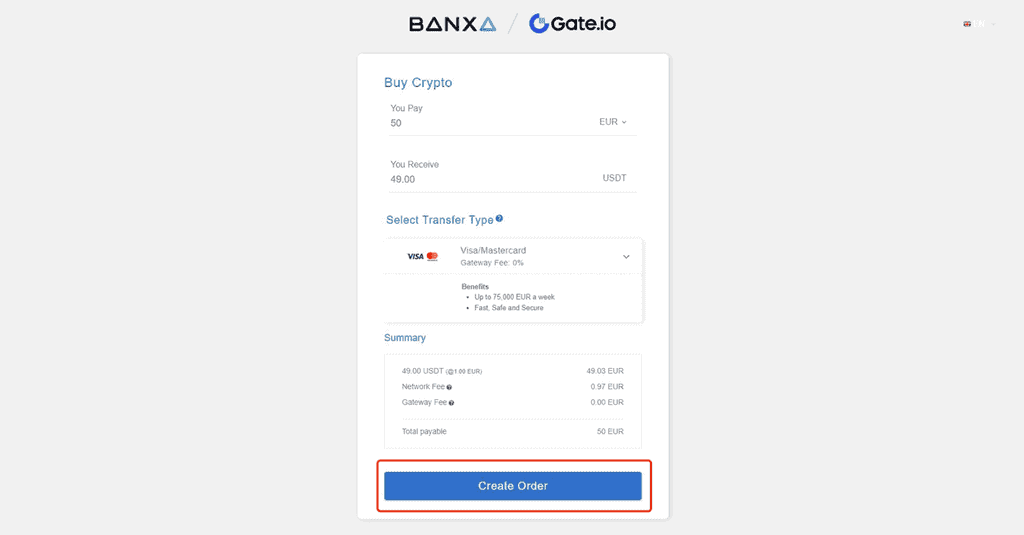
Follow the instructions on the third-party payment page to complete your order. You can complete your transaction if you already have an account on Banxa (or the third-payment party app you chose).
If you don’t have an account, you must verify your identity.
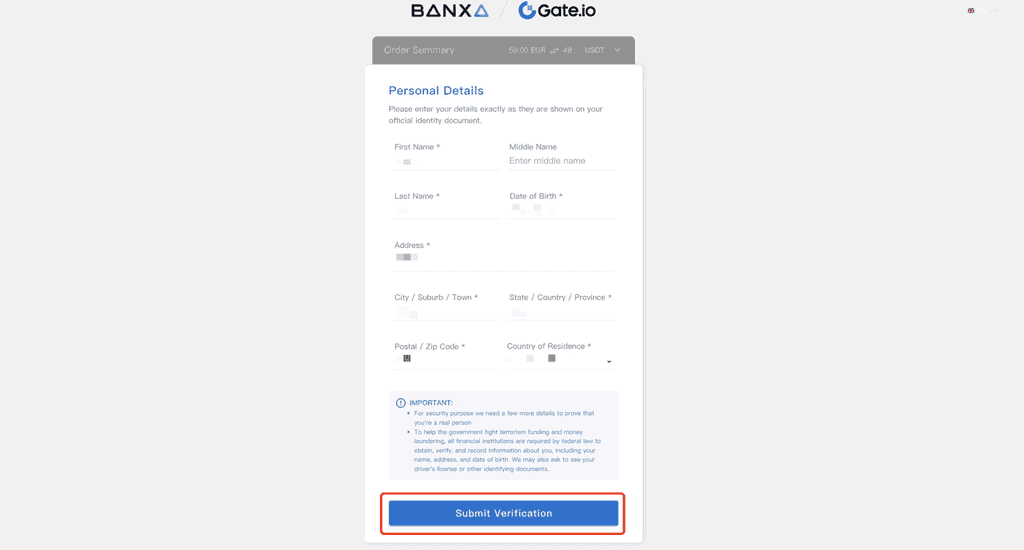
Fill in identity verification information.
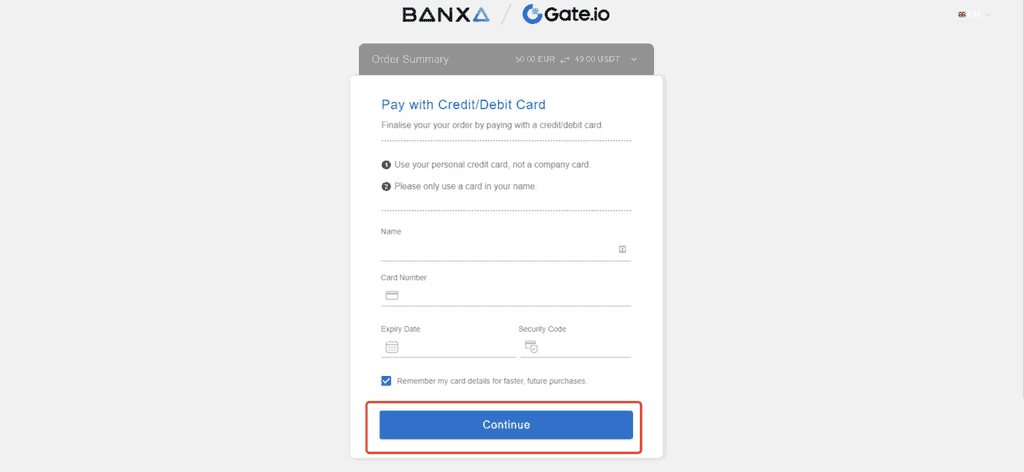
Enter your debit or credit card information to link your card with Banxa. Click “Continue.”
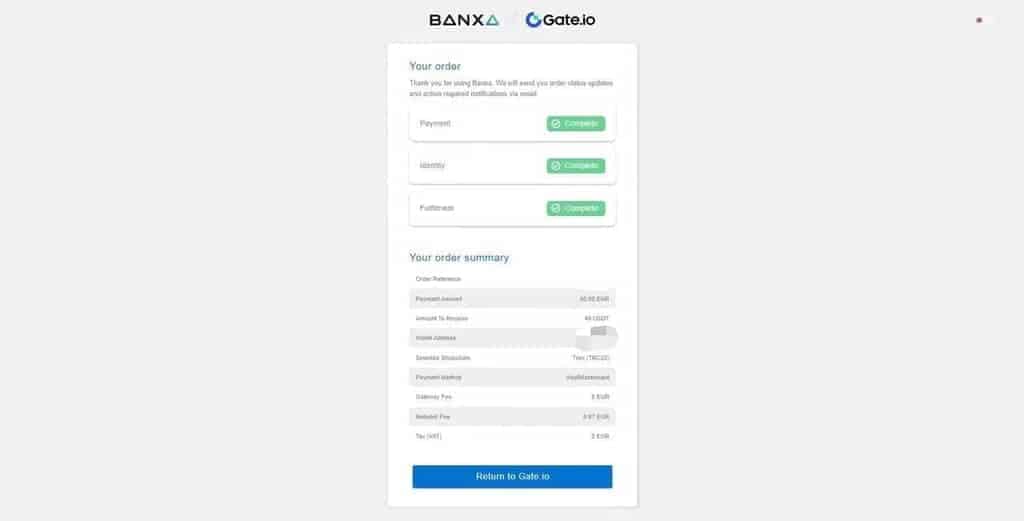
Congratulations! That’s pretty much it. Your assets will show up in your Dogecoin wallet. You can see your order by visiting your order history on your profile page.


