
How to Buy Bitcoin on Gate.io
Do you want to buy Bitcoin on Gate.io but don’t know how? We are here to help.
Here is a step-by-step guide on how to buy Bitcoin on Gate.io.
A Step-By-Step Guide on How to Buy Bitcoin on Gate.io
1. Register an Account on Gate.io
Follow our link to the Gate.io website to sign up for the exchange.
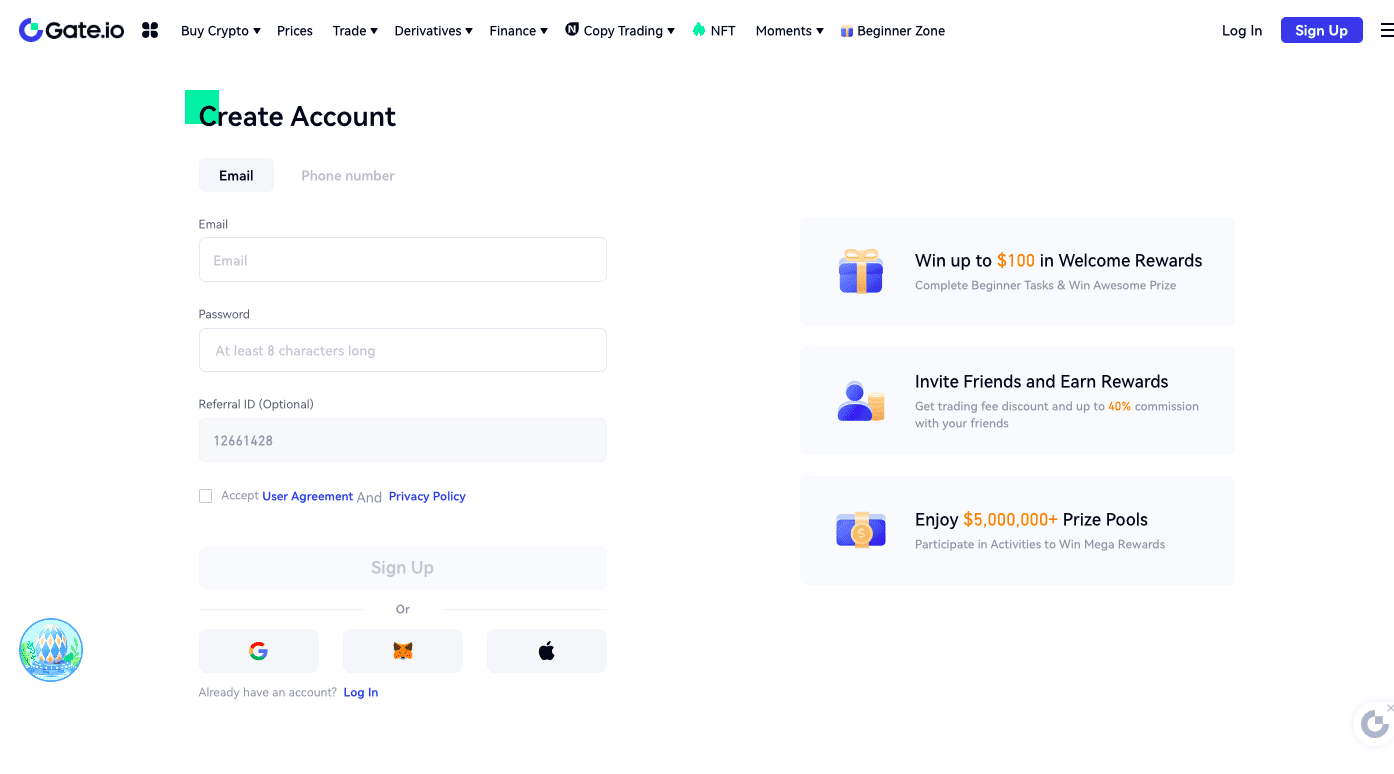
You can use your email address or phone number to open an account. You will receive a validation code from Gate.io after you register your account. Use the code to sign in.
2. Verify Your Account
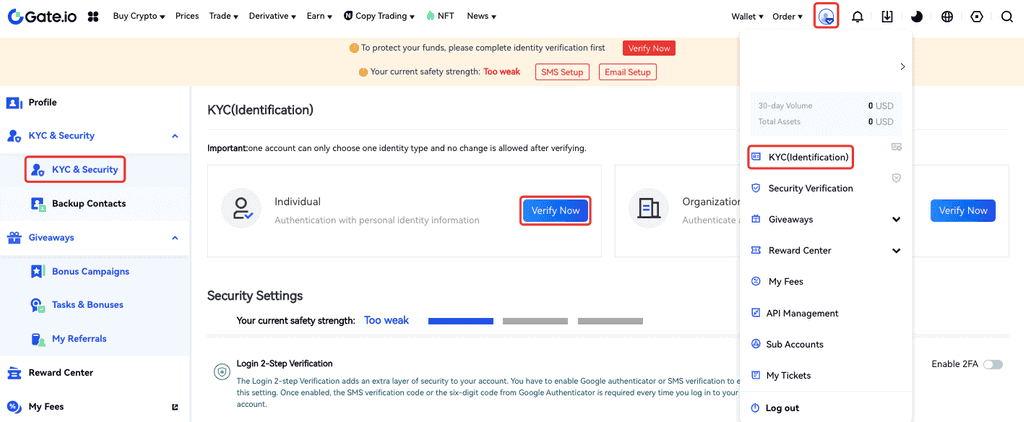
You must verify your identity to purchase Bitcoin with fiat currency. To do this, select the profile icon on the upper-right corner of the screen and hit the “KYC (Identification)” tab. Click “Verify Now” to start the process.
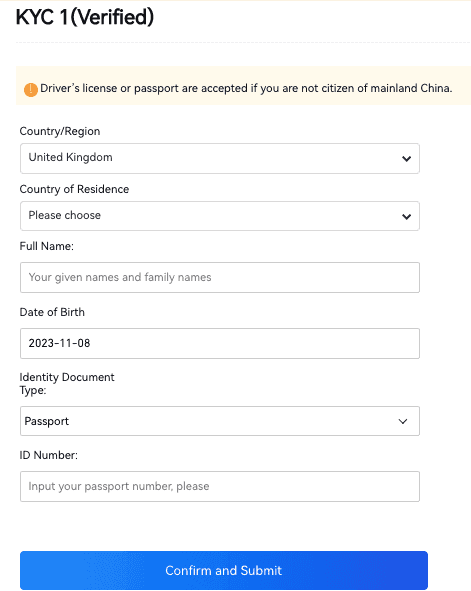
Fill out the form. Make sure you spell your name exactly as it is written on your ID document. Hit the “Confirm and Submit” button.
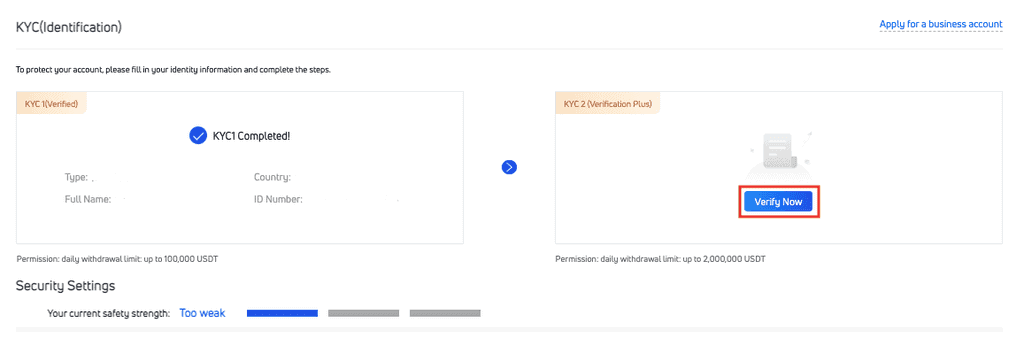
Go ahead and complete KYC 2 as well.
Enter your address information and upload an official photo ID.
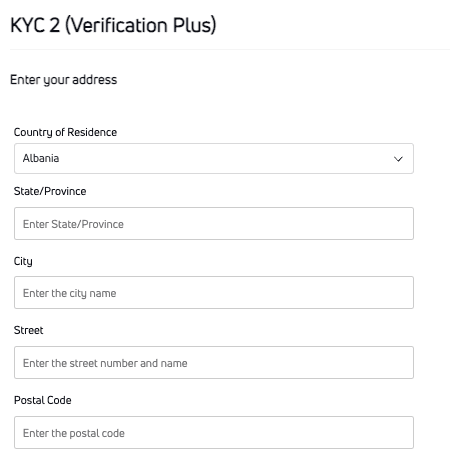
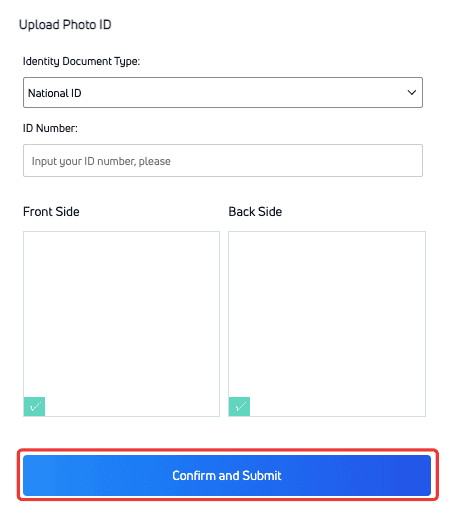
Click “Confirm and Submit.”
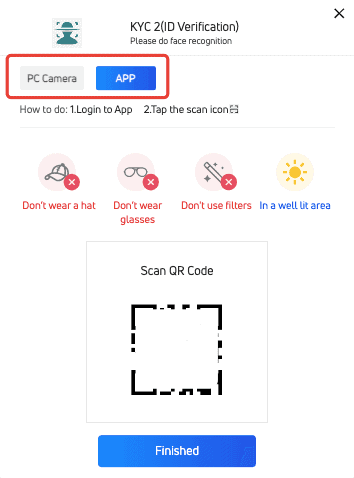
You will be prompted to verify your ID by initiating facial recognition or uploading a selfie. You can use the Gate.io app to complete this step.
If you have a working laptop camera, you can complete this step on your browser. The supported browsers are Brave, Chrome, Opera, and Firefox.
You can also use the Gate.io app on your phone if you don’t have a laptop camera.

Click “Go to Facial Recognition” to initiate the process.
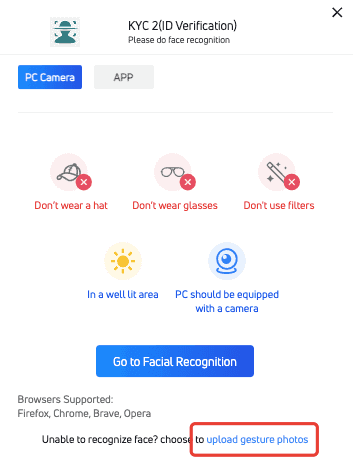
If facial recognition fails, you can upload “Gesture Photos” instead. Check out photo examples before you try to upload any pictures.
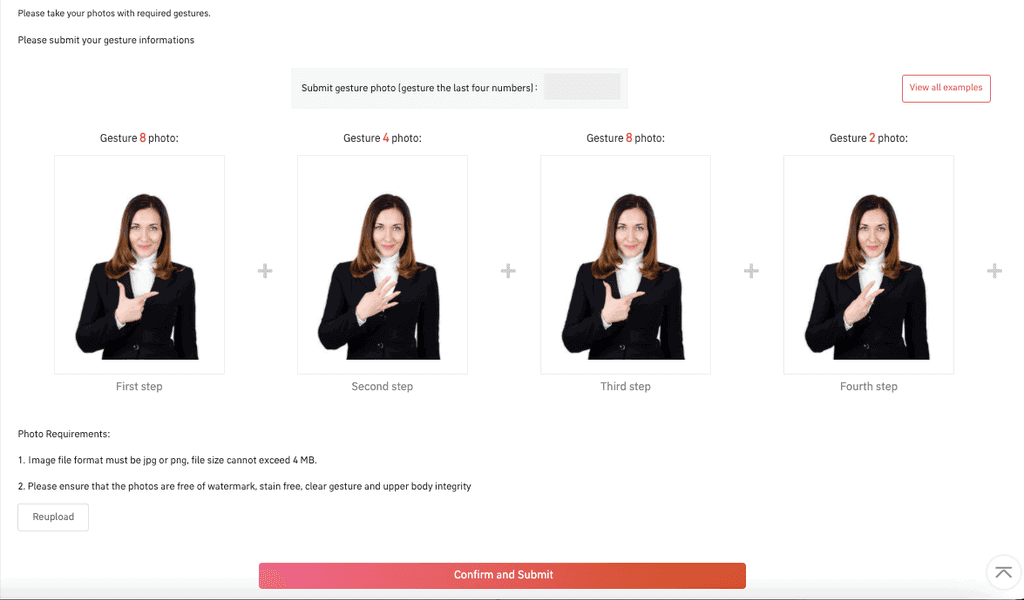
If you click “View all examples,” you will see multiple photo examples.
Once you have the photos, upload them in order and hit the “Confirm and Submit” button.
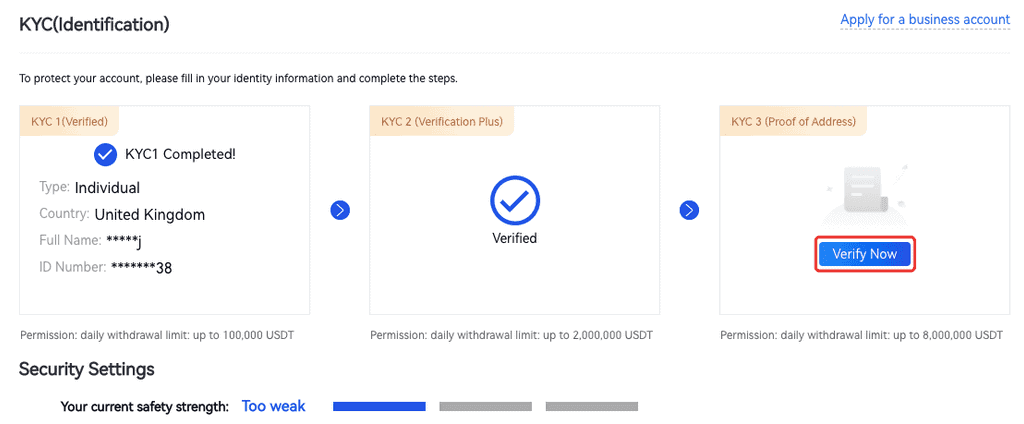
You are not required to complete KYC3 to buy BTC on Gate.io, but doing so increases your withdrawal limit considerably.
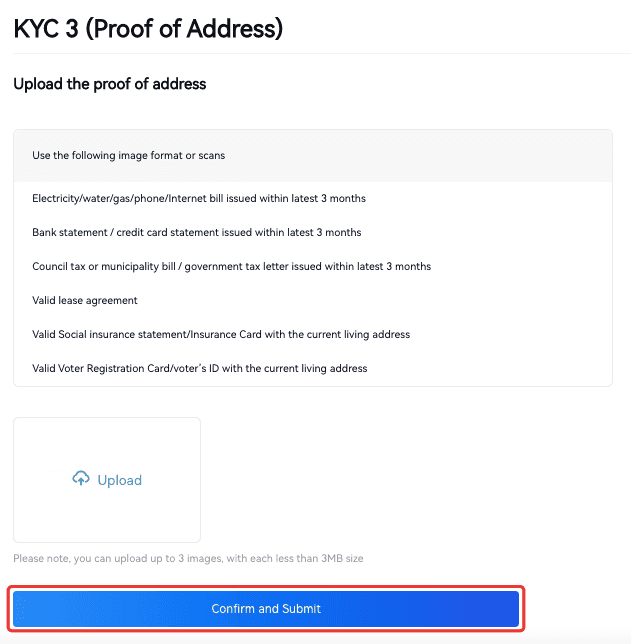
Once you submit your address proof-of-address documents, click “Confirm and Submit.”
3. Enable 2FA
Enabling two-factor authentication ensures that no one can log in to your account without accessing your phone as well as your password. Once you activate 2FA, you receive a code on your mobile phone whenever someone attempts to log in to your account. Login attempts will not work without the code.
Go to your account settings and select “Two-Factor Authentication.” You will see a QR code on the screen. You must download the Google Authentication app and scan the code.
The app creates a security key you will enter on the screen. Once you are done, hit the “Enable Two-factor Authentication” button to activate 2FA.
4. Deposit Funds/Crypto
If you already have digital assets in other wallets, you can transfer them to Gate.io and trade them for BTC. If you don’t own any cryptocurrency or don’t want to use crypto to buy BTC, skip to the next step.
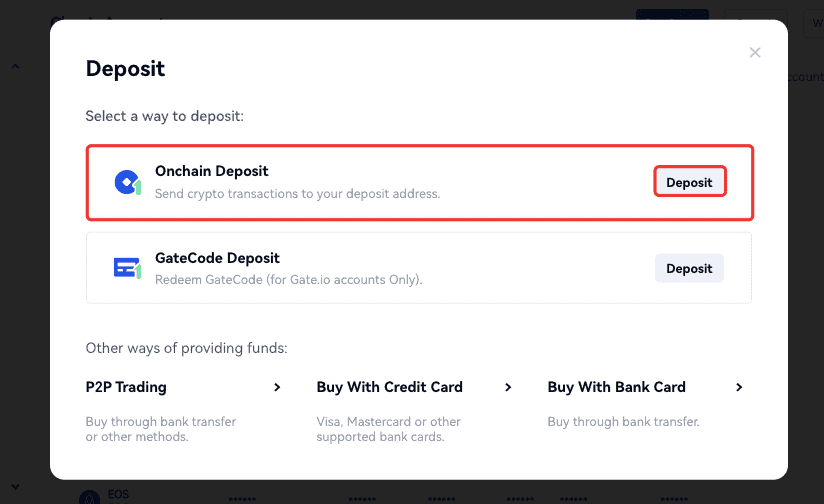
Depositing crypto to your account is very simple. Go to your “Wallets” page. Select the coin you want to deposit to the platform and click “Deposit.”
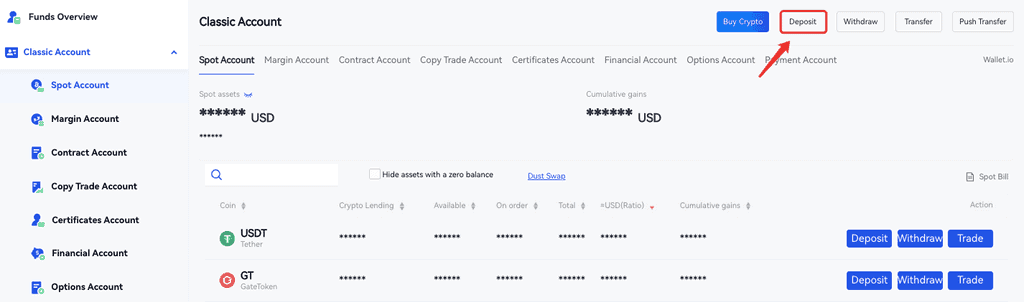
For example, if you select Tether (USDT) and click “Deposit,” you will receive a Tether deposit address. Now you can go to your other wallet (outside of Gate.io) and send your USDT to this new address.
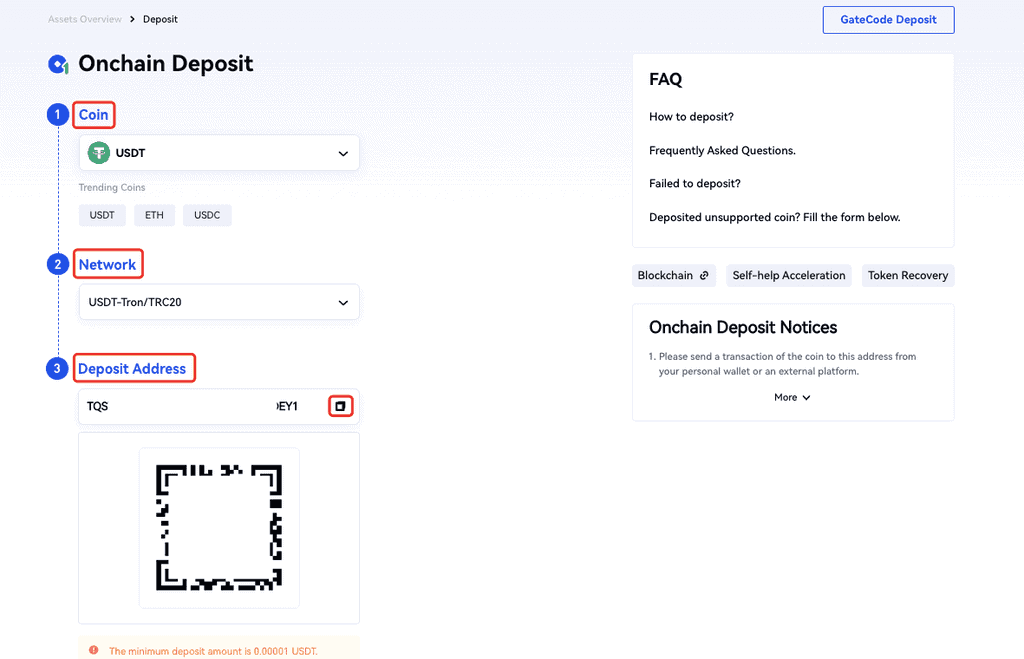
Your funds will show up after a few confirmations. You can see your deposit by clicking “Recent Deposit Records.”
3. Navigate to Buy Screen
There are two ways to buy Bitcoin on Gate.io. You can trade your digital assets for BTC or buy BTC via third-party payment apps.
Let’s look at both options.
Spot Trading
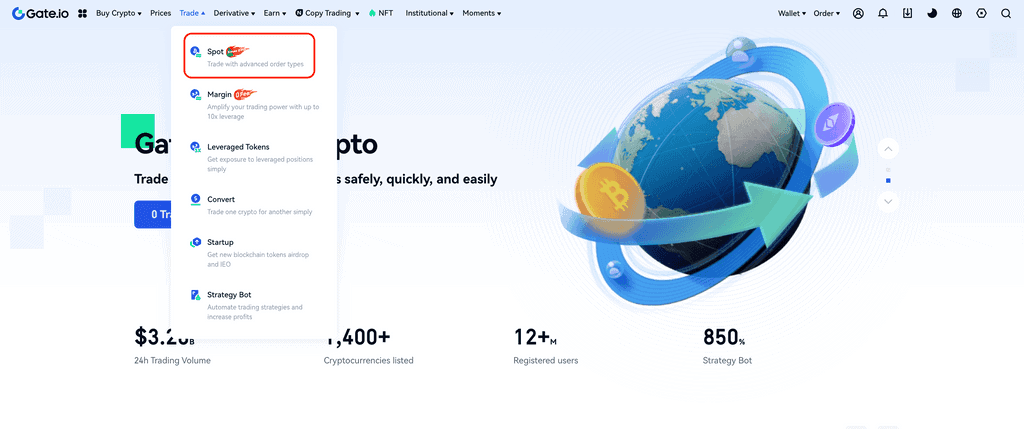
Select the “Trade” tab on top of your dashboard. Click on the “Spot” button.
Type the tickers of the trading pair you want to trade in the search box. If you type “BTC/ETH,” you can trade Ethereum (ETH) for BTC. If you just type BTC, you will see all the available markets for trading Bitcoin.
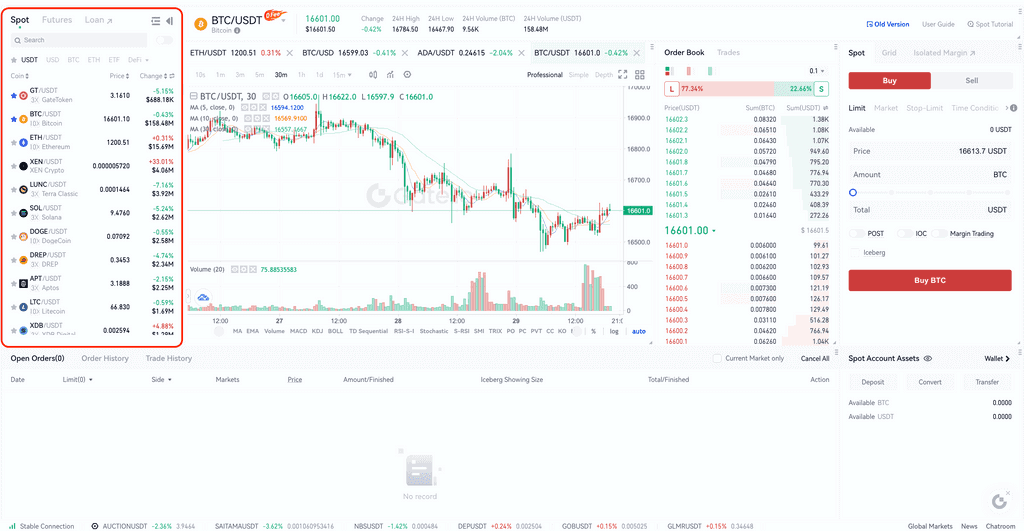
Once you have the right pairing, go ahead and fill out the trade form on the right side of the page. It’s set to “Limit” orders by default, though you can change your order type as you want. When placing a limit order, the price is automatically set to execute your order as soon as possible. You can manually adjust the price.
Click “Buy BTC.” Gate.io will display all the relevant fees and how much BTC you will receive. If you are happy with the transaction details, you can finalize your order.
Purchase Bitcoin with Your Credit Card
If you don’t have any digital assets, your best option is to use a third-party payment channel to buy BTC with a credit card. It’s quite simple.
Click the “Buy Crypto” tab on the upper-right side of the page. Choose “Pay With Credit Card” from the drop-down menu.
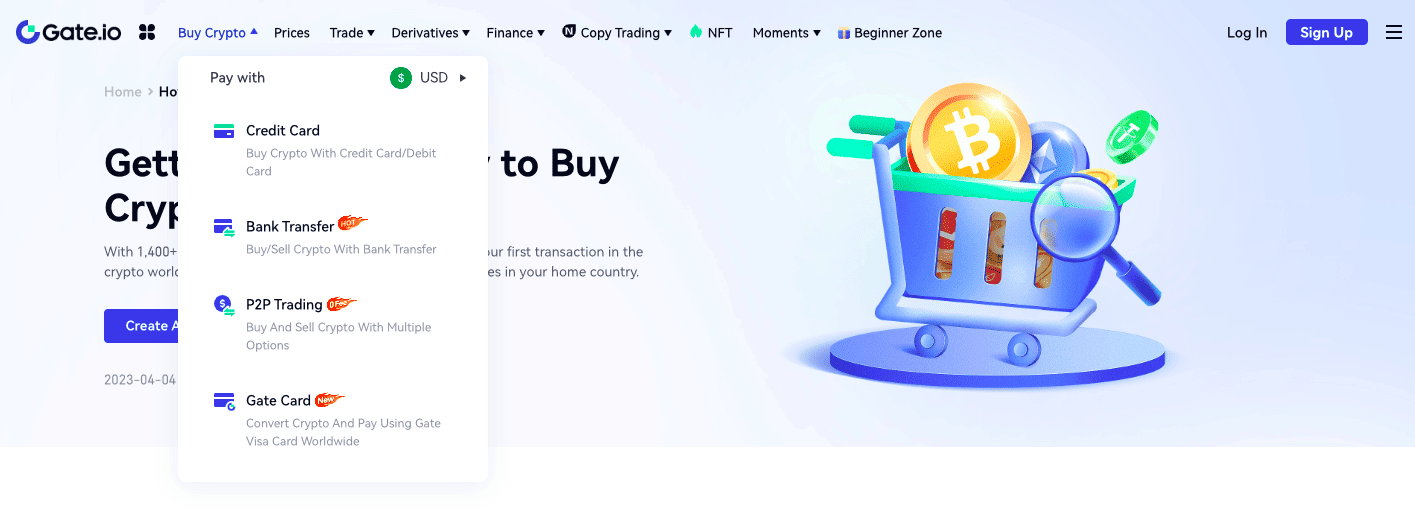
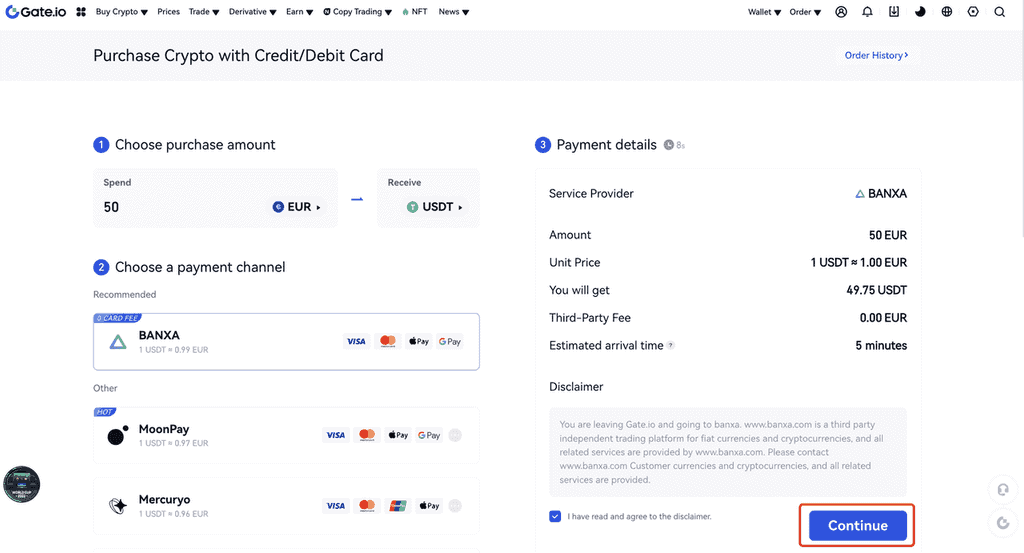
Fill out the order form by entering the amount you want to spend on BTC. Then choose a payment channel. Gate.io supports Banxa, Mercuyo, and MoonPay.
Each vendor offers a different rate of exchange and varying fees, which will be displayed on the left side of the screen.
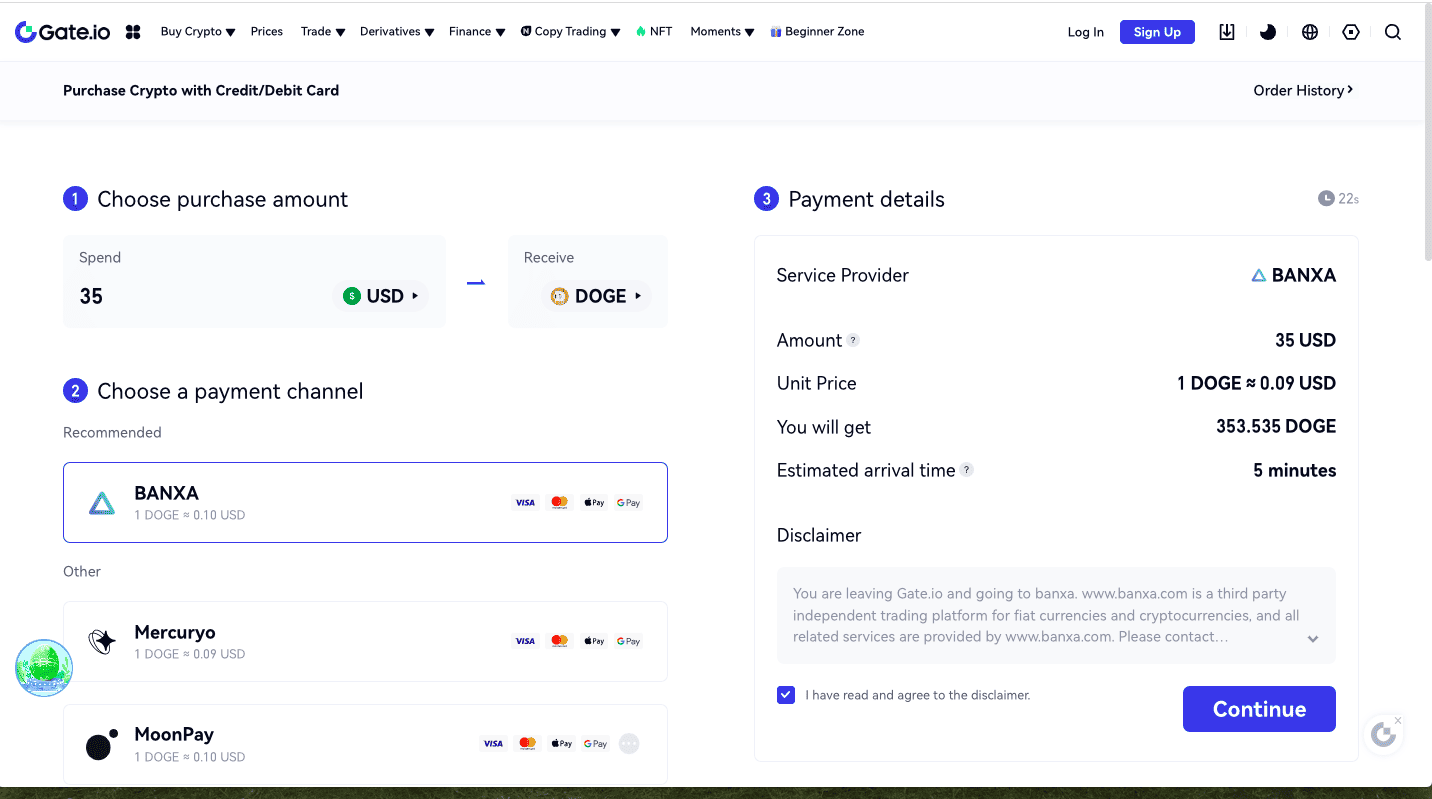
When you are ready to go, hit the “Continue” button.
Let’s say you selected to buy BTC via Banxa and already have a Banxa account linked to a payment method. If that’s the case, click “Create Order,” and your transaction will be confirmed.
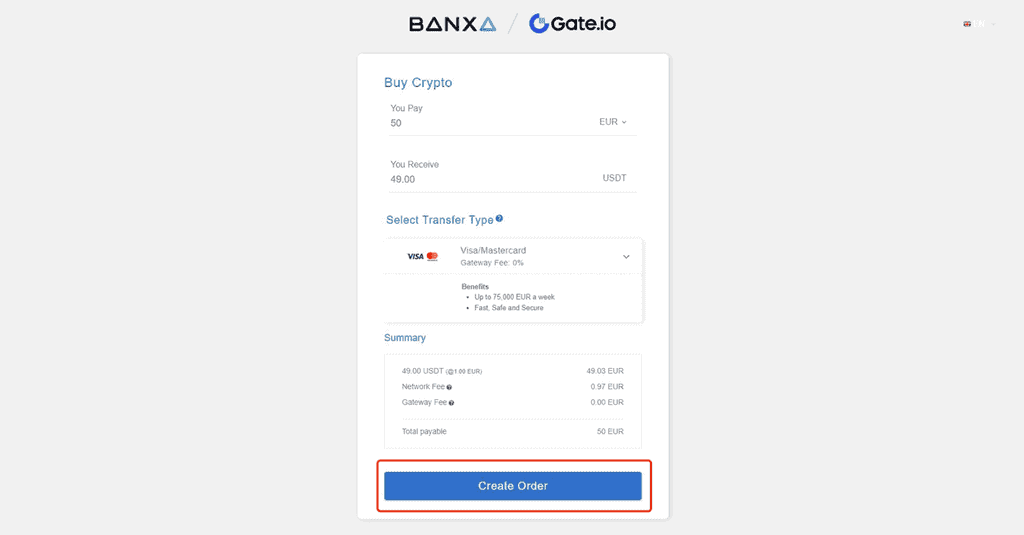
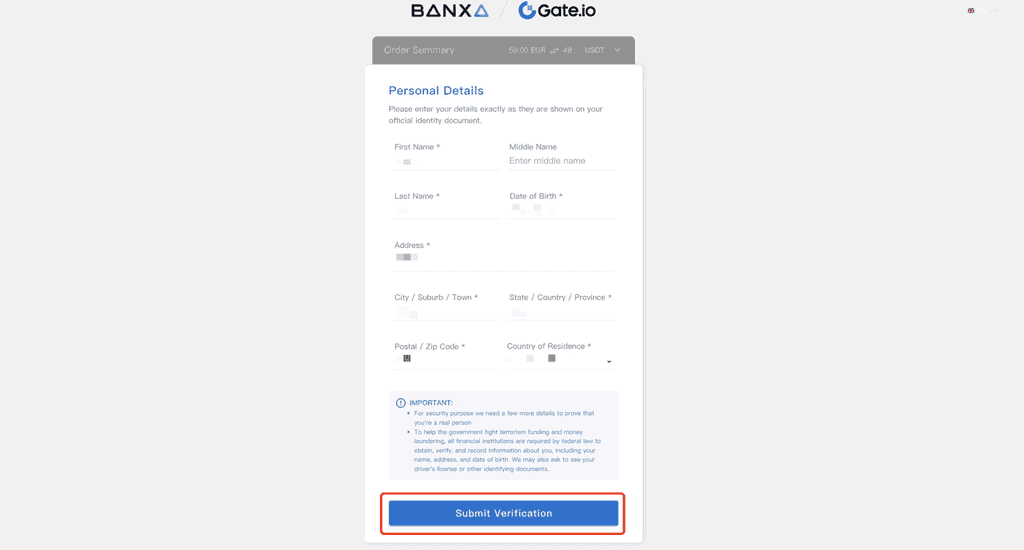
If this is your first time using Banxa (or one of the other channels), you can create your account on the go. Fill out the KYC form and click “Submit Verification.”
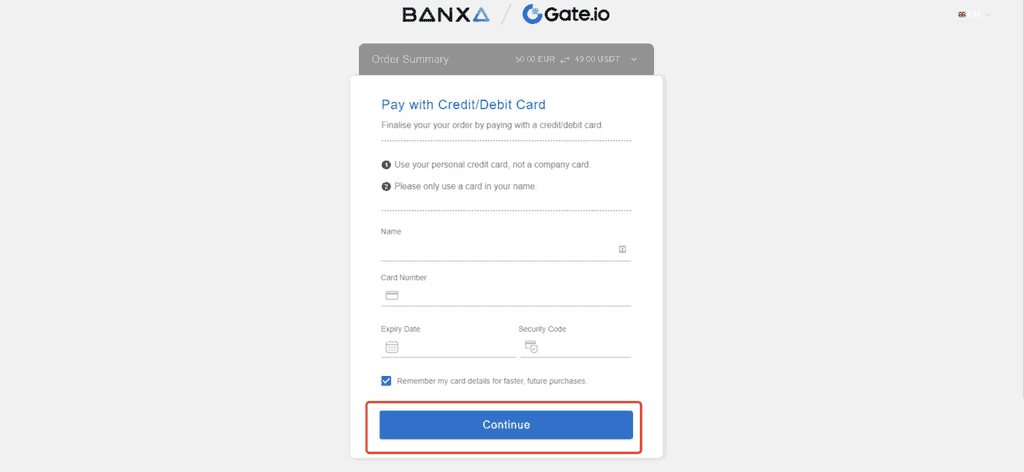
On the next page, enter your credit card details and click “Continue.”
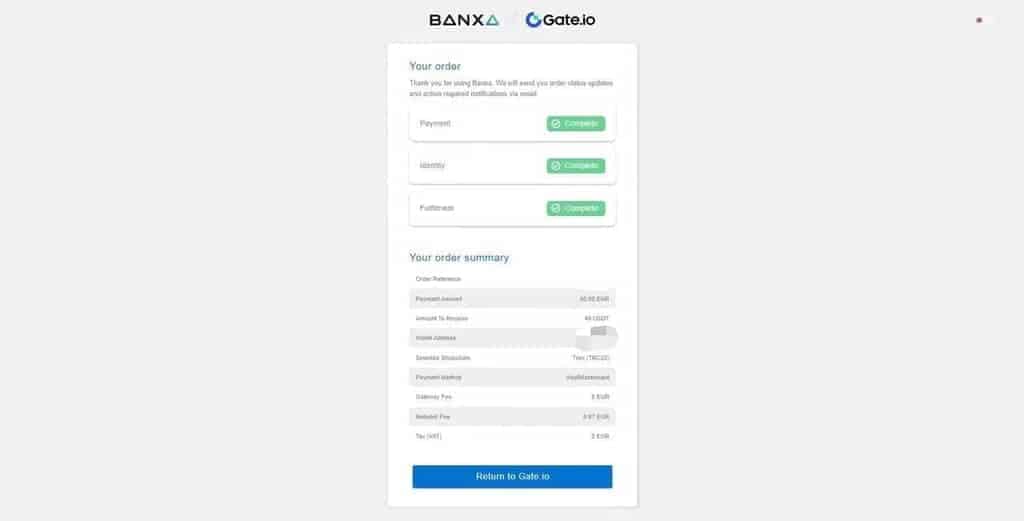
Your order will be processed immediately, and you’ll see your order summary on the screen.
And that’s how to buy Bitcoin on Gate.io. You can use these steps to buy other cryptocurrencies on Gate.io.
